How to Reduce Image Quality Online in 3 Steps (No Software, No Upload)
Reduce image quality in 3 steps with a free online tool that runs in your browser. No software, no upload, no watermark. Works for JPG, PNG, and WebP.
You want to reduce image quality for a smaller file, a meme effect, or to slip under a strict upload limit—and you do not want to install a program, sign up for an account, or hand your photo to a server you have never heard of. Good news: in 2026 you can reduce image quality directly in your browser, end to end, in under a minute.
This guide walks through three concrete steps using a free online image quality reducer. No software, no upload, no watermark. The same three steps work for JPG, PNG, and WebP files on any laptop or phone.
The entire process in three steps — no software, no upload, no waiting
Before You Start: What "Reducing Image Quality" Actually Does
When you reduce image quality, the tool re-encodes your image at a lower compression level. The pixel grid stays the same size, but more detail is discarded during encoding, which shrinks the file. A 4 MB photo at quality 80 might become 600 KB at quality 30—the same scene, same dimensions, just less information stored per pixel.
That is different from resizing (changing dimensions) and different from cropping (removing pixels). If you only need a smaller file, reducing quality is usually the right move because it keeps the framing intact and avoids the blurry look of an upscaled thumbnail.
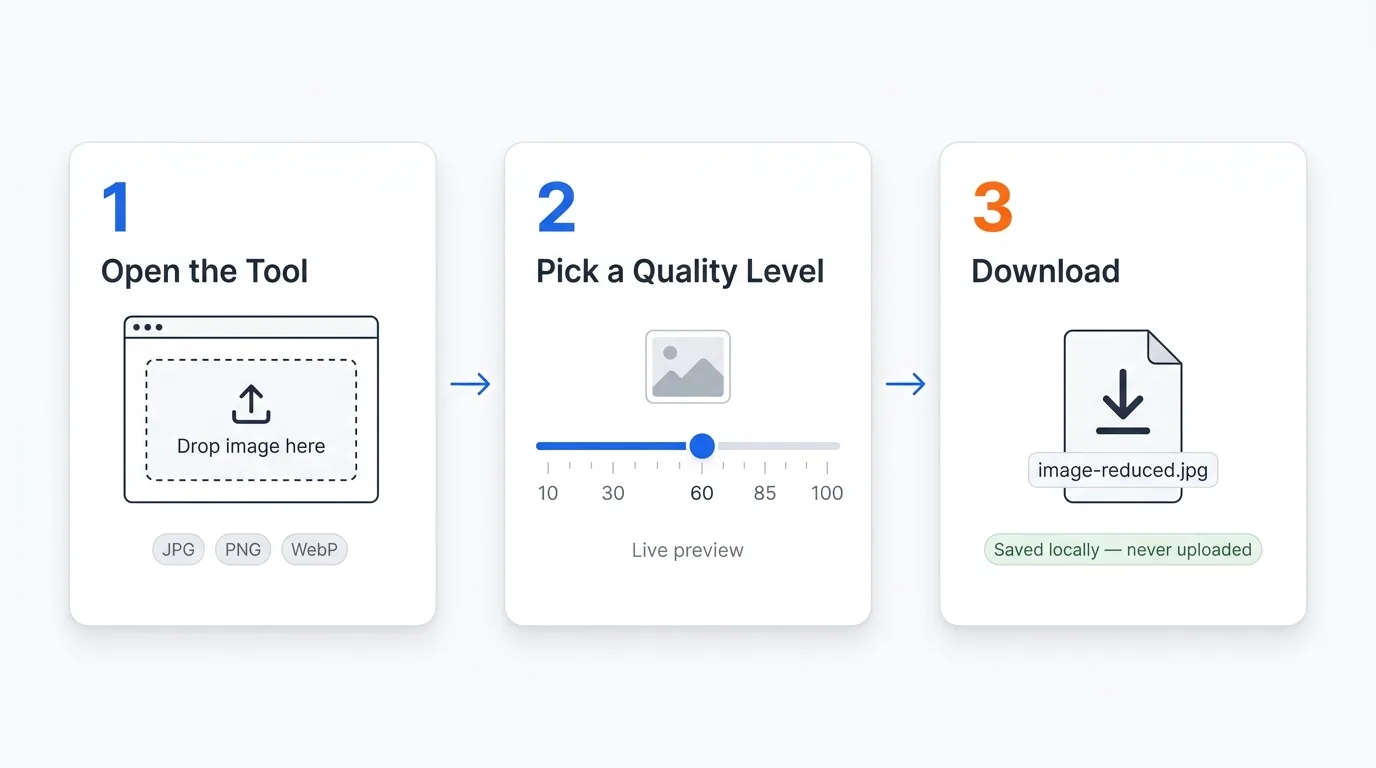
Step 1: Open the Image Quality Reducer
Open the free image quality reducer in any modern browser—Chrome, Safari, Firefox, or Edge all work. Nothing installs. There is no sign-up, no email gate, and no captcha. On mobile, the tool works the same way as on desktop; you do not need an app.
Drop your image onto the upload area, or tap to pick a file from your device. Supported formats:
- JPG / JPEG — the most common format and the one that benefits most from quality reduction
- PNG — good for screenshots and graphics; quality reduction converts to a lossy format to shrink the file
- WebP — already efficient; reducing quality further is useful when you need very small files
The image stays on your device the entire time. Everything happens right inside your browser, so the file never leaves your machine and never reaches our servers — there is nothing to upload, and nothing to download from a server when you are done.
Why it matters that nothing uploads:
Screenshots of work documents, ID photos, family pictures—if you would not post it publicly, you should not upload it to a random compression site. A browser-based tool keeps the image local, so even if the website disappeared tomorrow, your photo never went anywhere.
Step 2: Pick a Quality Level
After the image loads, you will see a quality slider. The number represents the output quality on a 1–100 scale, where lower means smaller file and more visible compression artifacts. Adjust it to match what you actually need:
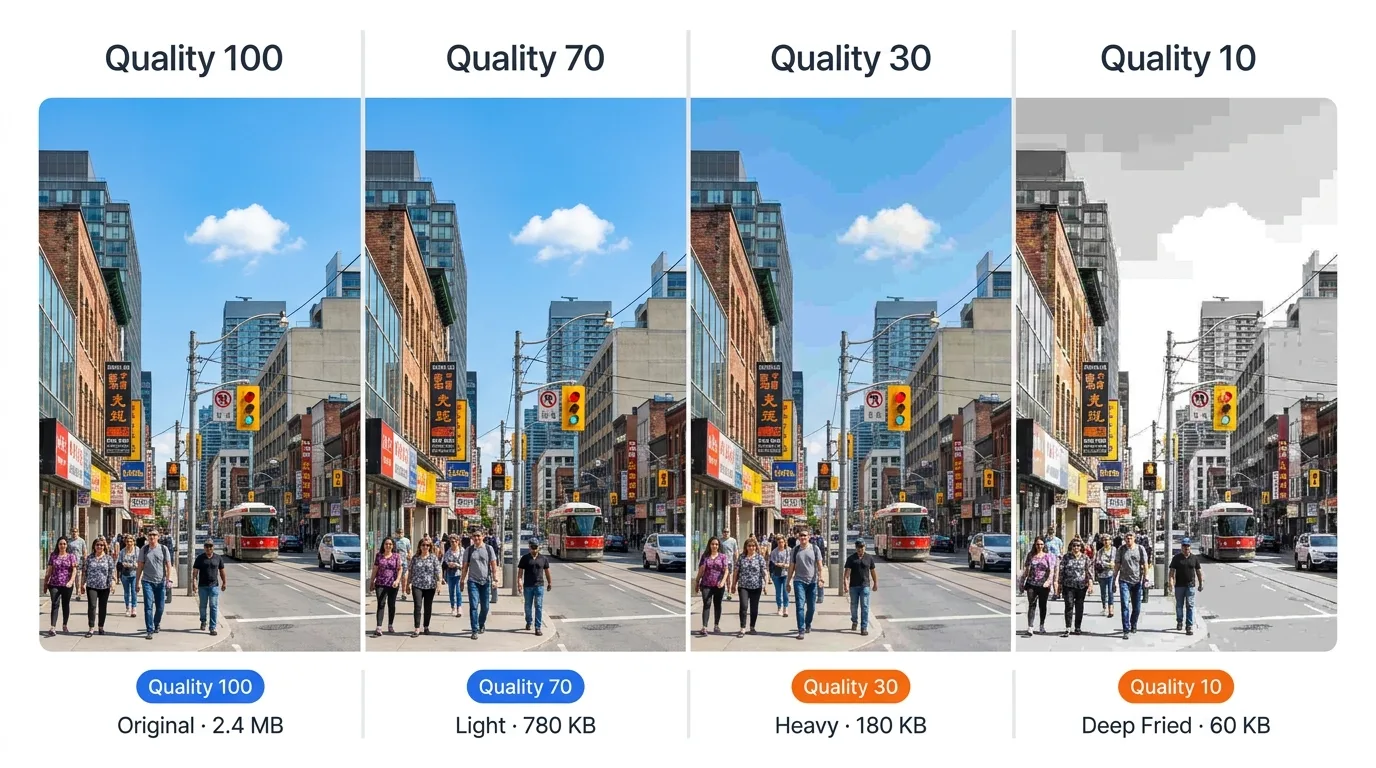
The same photo at quality 100, 70, 30, and 10 — file size drops from 2.4 MB to 60 KB
Quality 70–85: Light Reduction
Use this range when you want a smaller file but the image still has to look good—product photos for a website, an email attachment, a portfolio export. Most viewers will not notice the difference from the original at typical screen sizes, and the file shrinks by roughly 40–60%.
Quality 40–60: Aggressive Reduction
This is the sweet spot for chat apps, Discord, and most casual sharing. The image still looks fine on a phone screen, but the file shrinks dramatically—often to 15–25% of the original size. Good when you need to lower image quality enough to beat an upload limit without obvious damage.
Quality 10–30: Heavy Reduction
Visible compression artifacts appear: blocky edges, color banding, slight blur. Use this range for meme aesthetics, low-bandwidth sharing, or anywhere a "low quality" look is the actual goal. A 5 MB photo can drop to under 100 KB at quality 20.
Quality 1–10: Extreme "Deep Fried" Range
Reserved for the deep-fried meme look. Heavy artifacts, posterized colors, the unmistakable JPEG crunch. If you are not going for an intentional aesthetic effect, skip this range.
Quick rule of thumb:
Start at quality 60. Check the preview. If it still looks good and the file is small enough, you are done. If it looks bad, raise the quality. If the file is still too big, lower the quality. You will dial it in within two or three tries.
Step 3: Download the Result
Once the quality looks right in the preview, click the download button. The reduced-quality image saves to your device with a new filename, leaving the original untouched. From there you can attach it to an email, drop it into a chat, or upload it to wherever the original file was too big.
That is the entire process. Three steps, no account, no upload, no waiting for a server queue.
Picking the Right Quality for Common Use Cases
If you are not sure where to start, this maps the most common reasons people reduce image quality to a target quality level:
| Use Case | Suggested Quality | Why |
|---|---|---|
| Email attachment under a size cap | 60–75 | Big size cut, still looks normal when the recipient opens it |
| Discord / WhatsApp / iMessage | 40–60 | Mobile screen hides minor artifacts; uploads finish faster |
| Forum / Reddit upload limit | 50–70 | Most platforms re-compress anyway; pre-reducing avoids the hard size wall |
| Profile picture / avatar | 70–85 | Small dimensions mean the file is already tiny; keep quality higher |
| Meme / deep-fried aesthetic | 10–30 | Visible artifacts are the point |
| Storage cleanup for a photo folder | 75–85 | Light reduction recovers a lot of disk space with no visible loss |
Common Questions About Reducing Image Quality Online
Will reducing quality permanently damage my original file?
No. The tool produces a new file at the lower quality and downloads that. Your original image stays on your device exactly as it was. Always keep an unedited copy of any important photo—once a file is re-encoded at low quality, that quality is gone for good.
Can I reduce image quality on my phone?
Yes. The tool is browser-based, so the same three steps work on iOS Safari and Android Chrome. You do not need to install an app, sign in to an App Store, or grant unusual permissions—just open the page and pick a photo.
Why does my PNG get larger when I reduce its quality slightly?
PNG is a lossless format with no quality dial of its own, so the reducer converts it to a lossy format to actually shrink the file. At very high quality settings, that conversion can occasionally produce a file that is similar to—or even slightly larger than—the original PNG. If that happens, drop the quality lower or accept the original.
Is this the same as image compression?
Closely related but not identical. An image compressor is usually tuned to find the smallest file at acceptable quality automatically. A quality reducer gives you the slider directly so you can pick a specific quality level—useful when you want a particular look or need to hit a specific file size. We break down the difference in a separate guide on choosing the right format for compression.
What is the file size limit?
The tool handles files up to 100 MB, which covers virtually any photo from a phone or DSLR.
When You Should Not Use a Browser-Based Reducer
Browser tools are the right choice for almost every casual and professional use case, but there are two situations where you may want something else:
- Hundreds or thousands of images in one batch: a scripted tool like ImageMagick is faster and more predictable than a manual interface
- Specific artistic editing alongside compression: if you also need to add filters, color grade, or composite layers, a full editor like Photoshop or GIMP gives you control the browser tool deliberately does not include
For everything else—email attachments, chat sharing, meme creation, storage cleanup, working under an upload cap—reducing image quality in a browser is the fastest, most private route.
Recap: Three Steps to Lower Image Quality Online
- Open the image quality reducer and drop in a JPG, PNG, or WebP file
- Pick a quality level on the slider—40–60 for general use, 70–85 for light reduction, 10–30 for meme effects
- Download the reduced file; the original on your device stays untouched
The whole process takes under a minute, runs entirely in your browser, and costs nothing. You do not need an account, you do not upload anything, and there is no watermark on the output.
Ready to reduce image quality now? Open the free image quality reducer and try it on a photo. If you want the broader picture of how browser-based tools compare to Photoshop, ImageMagick, and other online services, the 5 methods comparison is a good follow-up read.
Ready to Compress Your Images?
Try our free online image compression tool. All processing happens in your browser - fast, private, and easy to use.
Related Articles
Make an Instagram 3×3 Grid From One Photo (Without the Order Coming Out Backward)
Split one photo into a 3×3 Instagram grid the right way: prep the aspect ratio, use live grid lines, and post in reverse order so the mosaic does not scramble.
How to Remove Image Background Without Uploading to a Server
Remove image background for free — your photo stays on your own device, nothing gets uploaded. No signup, no watermark, unlimited.
How to Make Deep Fried Memes: Step-by-Step Guide (2026)
Learn how to make deep fried memes with 4 methods compared. From Photoshop to free browser tools — create perfectly crunchy, nuked memes in seconds.