Make an Instagram 3×3 Grid From One Photo (Without the Order Coming Out Backward)
Split one photo into a 3×3 Instagram grid the right way: prep the aspect ratio, use live grid lines, and post in reverse order so the mosaic does not scramble.
You spent twenty minutes splitting a photo into nine perfect tiles. You opened Instagram, uploaded the first piece, then the second, then the third — and when you scrolled back to your profile, the image was scrambled. The top-left tile was at the bottom. The center was in the wrong corner. The face that should have been front-and-center had landed in the last row.
This is the part nobody tells you about Instagram 3×3 grids: the feed displays posts in reverse order. To make the grid look right, you have to post the bottom-right tile first and the top-left tile last. Most online tutorials skip this, which is why most first attempts at a 3×3 grid come out backward.
This guide covers the parts that actually matter: how to prepare the source photo so Instagram does not crop it, how to split it cleanly, the exact posting order, and the three mistakes that ruin grids even when the split is technically correct.
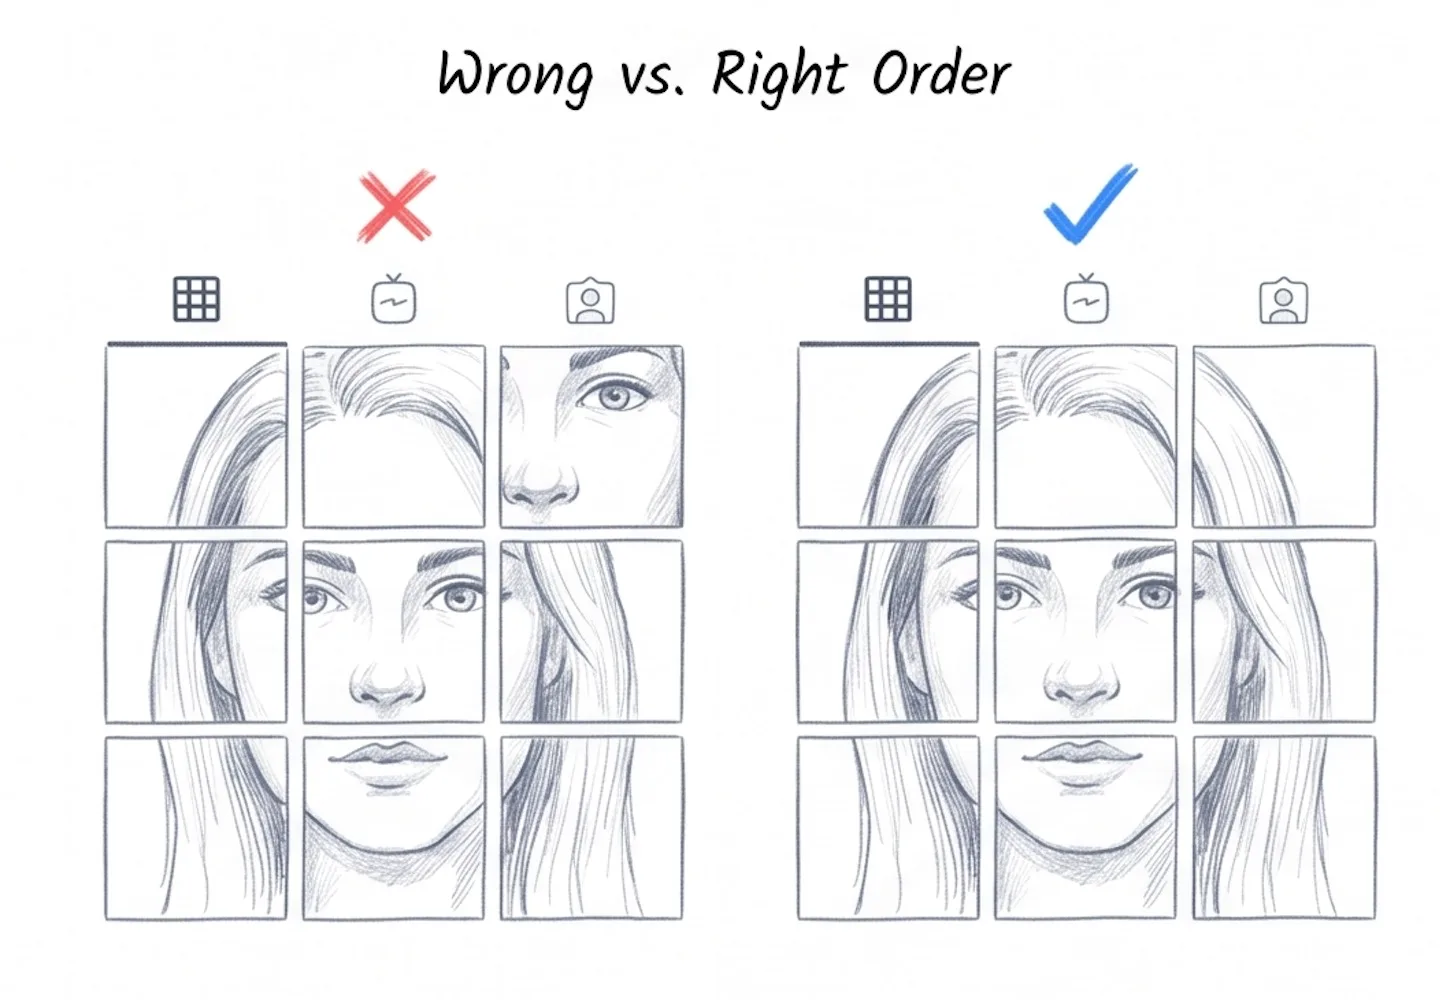
Same nine tiles, two posting orders — only the right one keeps the grid intact
The 30-Second Version
If you just need the steps and trust the explanation for later, here is the entire flow:
- Crop your photo to 1:1 before splitting. Instagram posts are square (or 4:5 at most). A 16:9 photo split into a 3×3 grid will get cropped tile by tile after you upload, and your framing will not survive.
- Drop the square photo into the image splitter and use the 3×3 Instagram Grid preset. Live grid lines appear on the photo so you can see exactly where each cut will land. Download the ZIP.
- Post the tiles in reverse order: bottom-right first, then bottom-middle, then bottom-left, then middle-right, middle, middle-left, and finally the top row right to left. The most recent post sits in the top-left of your feed, so the last tile you post is the one that appears top-left.
That is the whole process. If you want the reasoning behind each step — and the three things that still go wrong even when you follow them — read on.
Why One Photo, Nine Posts? The Use Cases That Actually Justify It
Grid splits are not just a visual trick. They show up in several very different content patterns, and the layout you pick should match what you are actually trying to do:
- 3×3 mosaic feed — one large photograph or illustration broken across nine consecutive posts. Works for portfolio reveals, product launches, and brand announcements where you want a visitor to land on your profile and see the whole image at once.
- 3×1 welcome bar — a single horizontal banner across the top row of your profile. Good for stating who you are or what you do without committing nine posts to it.
- 1×3 panorama carousel — a wide photo split into three side-by-side slides inside one carousel post. Followers swipe through and see the panorama unfold. This is a single post, not a grid, and the posting-order rule below does not apply to it.
- Print or wall mosaic — the same workflow lets you split a photo into a 4×4 or 5×5 grid for tiled printing. The source aspect ratio and tile count just follow the print layout instead of Instagram's.
Aspect Ratio First, Grid Second
The biggest single mistake in grid prep is splitting before cropping. People drop a phone photo — typically 4:3 or 16:9 — into a splitter, take the nine tiles, upload them, and discover that Instagram has cropped each tile to 1:1 on the way in. Faces get sliced. Heads get cut off. The bottom of the original frame disappears.
Instagram feed posts display at 1:1 by default, with 4:5 as the tallest allowed crop. If your source photo is not already one of those ratios, every tile you upload gets re-cropped by Instagram. For a 3×3 grid, the safe starting ratio is 1:1 — a perfect square, so that each of the nine tiles is also square and survives the upload untouched.
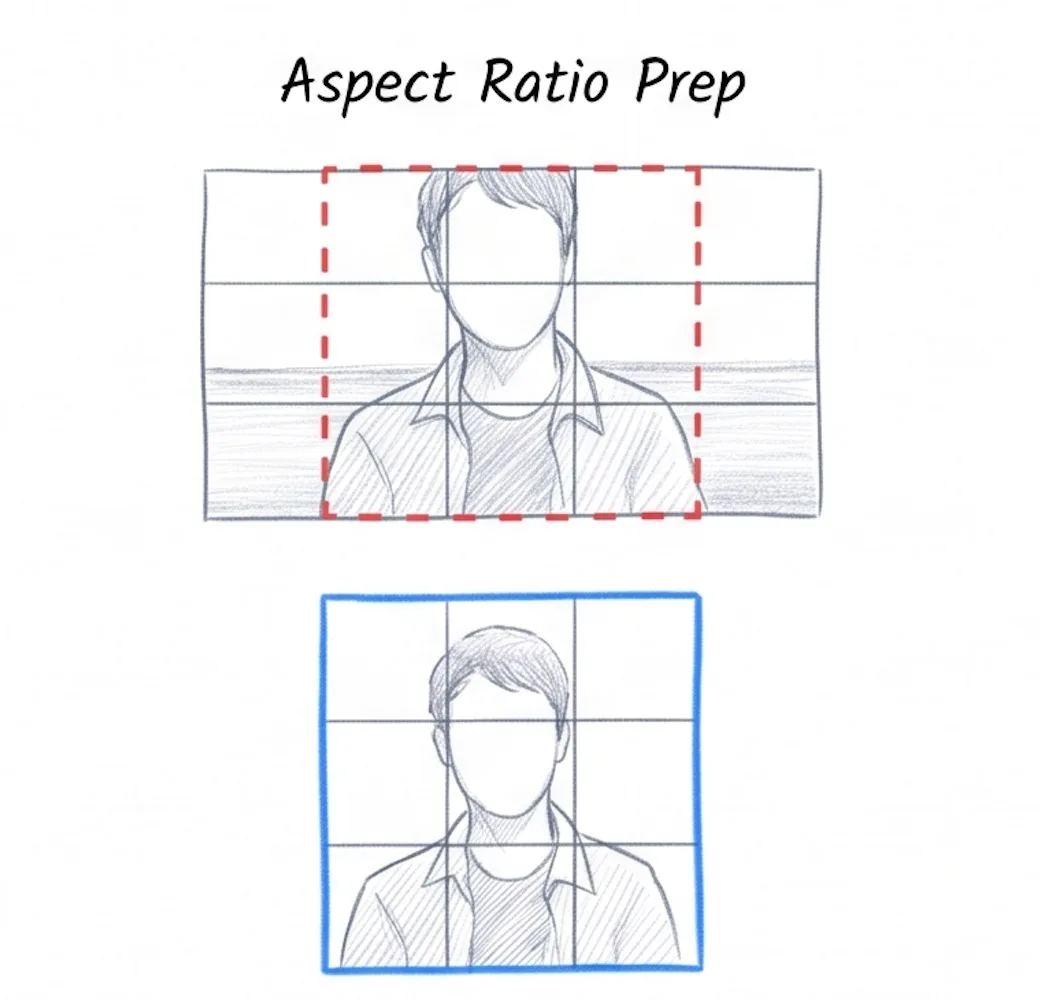
Left: a 16:9 photo split 3×3 — Instagram re-crops each tile and the subject is sliced. Right: a 1:1 source — every tile survives intact.
The fix is one extra step. Before splitting, open the crop tool and crop your source to a 1:1 square. Compose the crop so the important parts of the photo — faces, focal points, brand marks — sit safely inside what will become individual tiles, not on the edges where the grid lines will cut. Then drop the square into the image splitter and use the 3×3 Instagram Grid preset.
For a 1×3 carousel, the rule changes. Carousels accept wide source material, so you can split a 3:1 panorama directly without a pre-crop. The splitter's 1×3 Carousel preset is designed for exactly this layout.
The Posting-Order Trick (The Part Everyone Gets Wrong)
Instagram feeds display posts in reverse chronological order. The post you make most recently sits in the top-left of your profile grid, and older posts move down and to the right as you keep posting. For a 3×3 grid mosaic, this means the order you upload the tiles has to be the mirror of how you want them to appear.
The image splitter names each tile by row and column — tile_r1_c1 is the top-left of the original photo, tile_r3_c3 is the bottom-right. To make the grid appear correctly on your profile, you post them in this order:
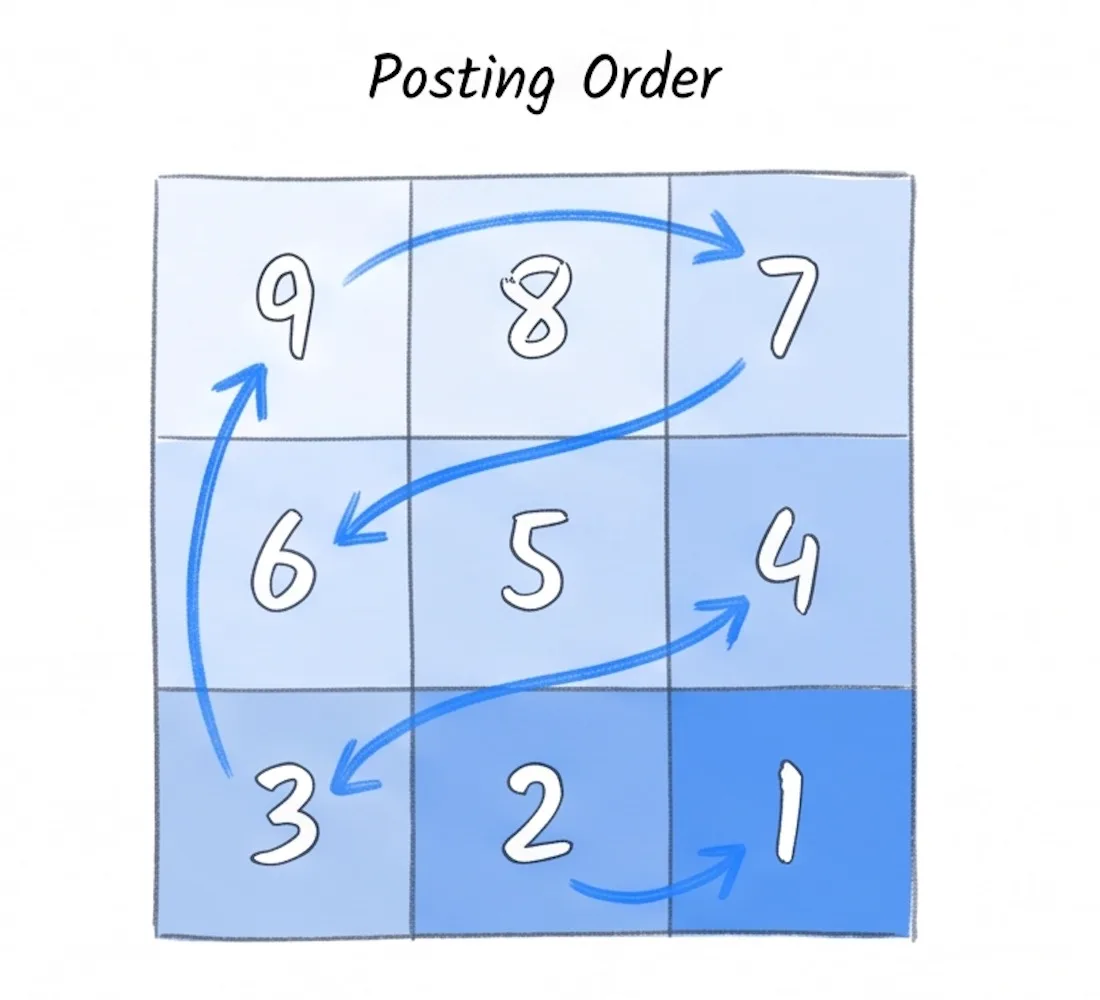
Posting order for a 3×3 grid — start with the bottom-right tile and work backward across each row
- Post 1:
tile_r3_c3(bottom-right of original) - Post 2:
tile_r3_c2(bottom-middle) - Post 3:
tile_r3_c1(bottom-left) - Post 4:
tile_r2_c3(middle-right) - Post 5:
tile_r2_c2(center) - Post 6:
tile_r2_c1(middle-left) - Post 7:
tile_r1_c3(top-right) - Post 8:
tile_r1_c2(top-middle) - Post 9:
tile_r1_c1(top-left of original — this is the last upload)
Post the nine tiles back-to-back:
If a different post slips in between two grid tiles, the whole mosaic shifts by one cell and the alignment breaks. Either upload all nine in one session, or use a scheduling tool to queue them one minute apart. Some creators turn off post notifications until the whole grid is up, so followers see the completed mosaic on their next visit instead of nine separate uploads in their feed.
For a 1×3 carousel the order is the opposite: you upload all three slides into a single post in left-to-right order, and swiping reveals the panorama from left to right. There is no reverse trick because a carousel is one post, not three.
Three Mistakes That Still Ruin Grids
Even with the right aspect ratio and the right posting order, three things commonly go wrong. Each of them is easy to fix once you know to check for it.
1. Faces and Focal Points Crossing Grid Lines
If a face sits exactly where the splitter is going to cut, the eye lands on one tile and the mouth on another. The mosaic looks unsettling and the individual tiles look broken when seen alone in someone's feed. The live grid preview in the image splitter exists for this reason: the guide lines appear over your photo before you download anything. Shift the crop in the crop tool until faces, logos, and key elements sit inside a single tile rather than across two.
2. Edge Mismatch From the Gutter Between Posts
Instagram's grid view adds a thin gap between each post. This means a continuous line in your photo — a horizon, a road, a building edge — will appear slightly broken at every tile border because of that gutter. The grid still works, but if you want the seam to feel invisible, avoid placing strong horizontal or vertical lines exactly on tile boundaries. Compose the original photo so the horizon runs through the middle of a row, not along a row edge.
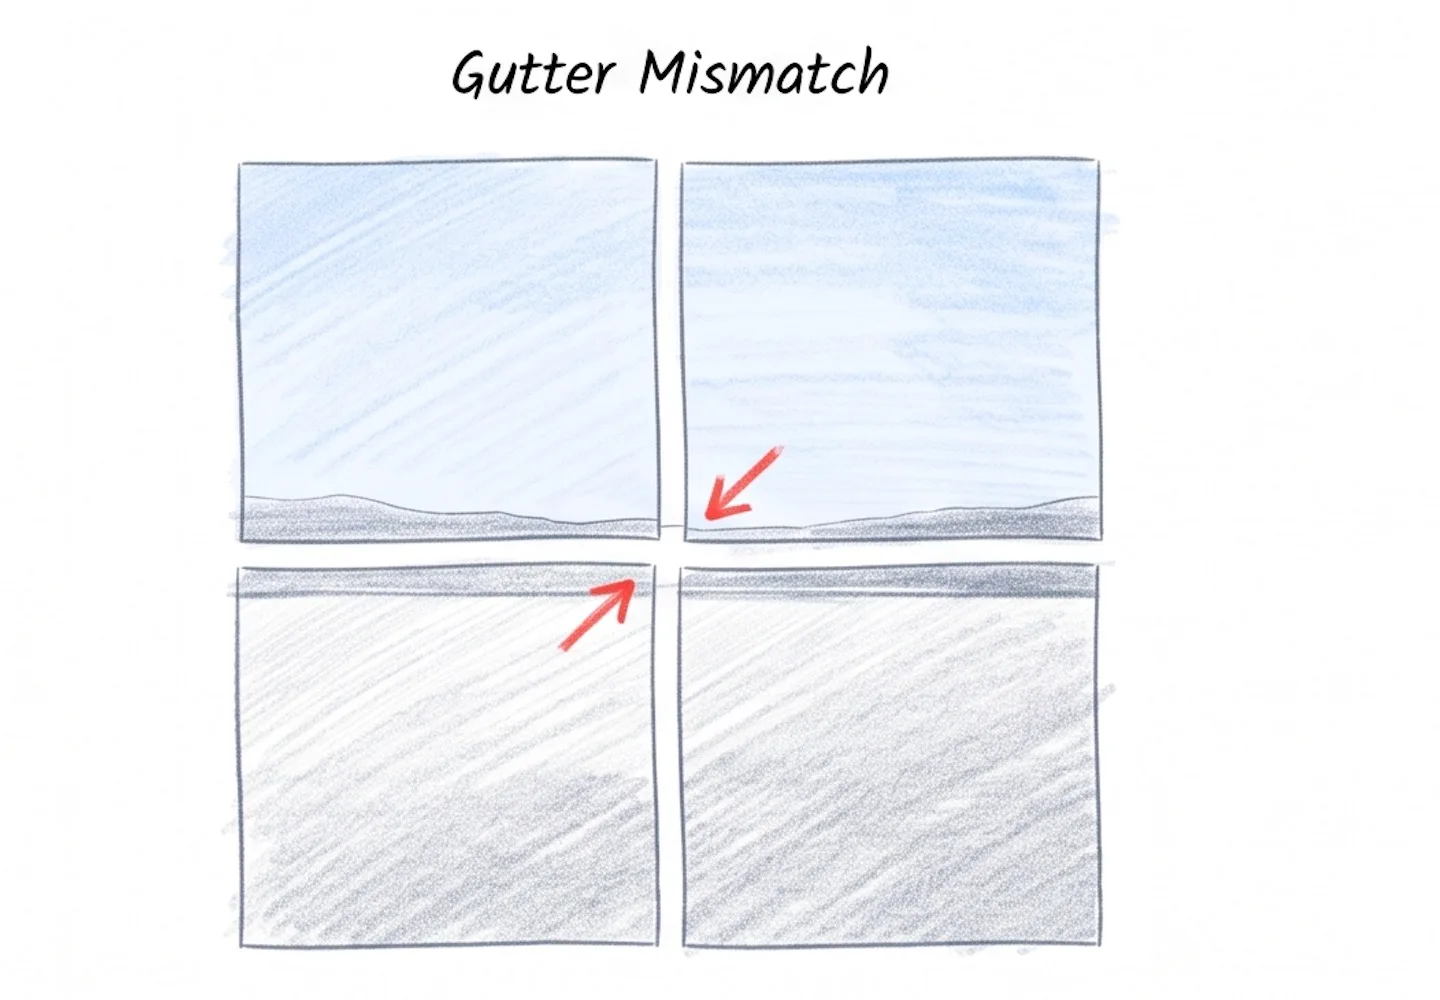
The horizon was placed right on a tile boundary — the gutter between posts breaks the line
3. Aspect Drift From Skipping the Square Crop
This is the failure mode from the section above, and it deserves a second mention because it is the one people repeat. Splitting before cropping to 1:1 produces tiles that Instagram re-crops on upload, often shaving pixels off the top or bottom of each tile. Always crop first, then split.
When a Browser Image Splitter Isn't the Right Tool
A browser-based splitter is the right choice for almost every creator preparing a one-off Instagram grid, but there are two situations where something else fits better:
- Batch automation for an agency or brand pipeline: if you are slicing dozens of grids a month for different campaigns, Photoshop's Slice tool with an Action — or a scripted approach in ImageMagick — gives you repeatable output without re-doing the steps manually each time.
- Schedule-and-split in one workflow: apps like Later or Planoly let you upload a single image, split it inside the tool, and schedule all nine posts in one session. If you are already paying for one of these schedulers, the in-app splitter saves a step.
For the more common case — a creator who wants to split one photo for one grid without signing up for a service, paying a fee, or sending personal images to a server — a free browser image splitter is the simplest route. The image splitter on this site shows the grid lines live on your photo, downloads every tile in a single ZIP, and keeps the original on your device the entire time.
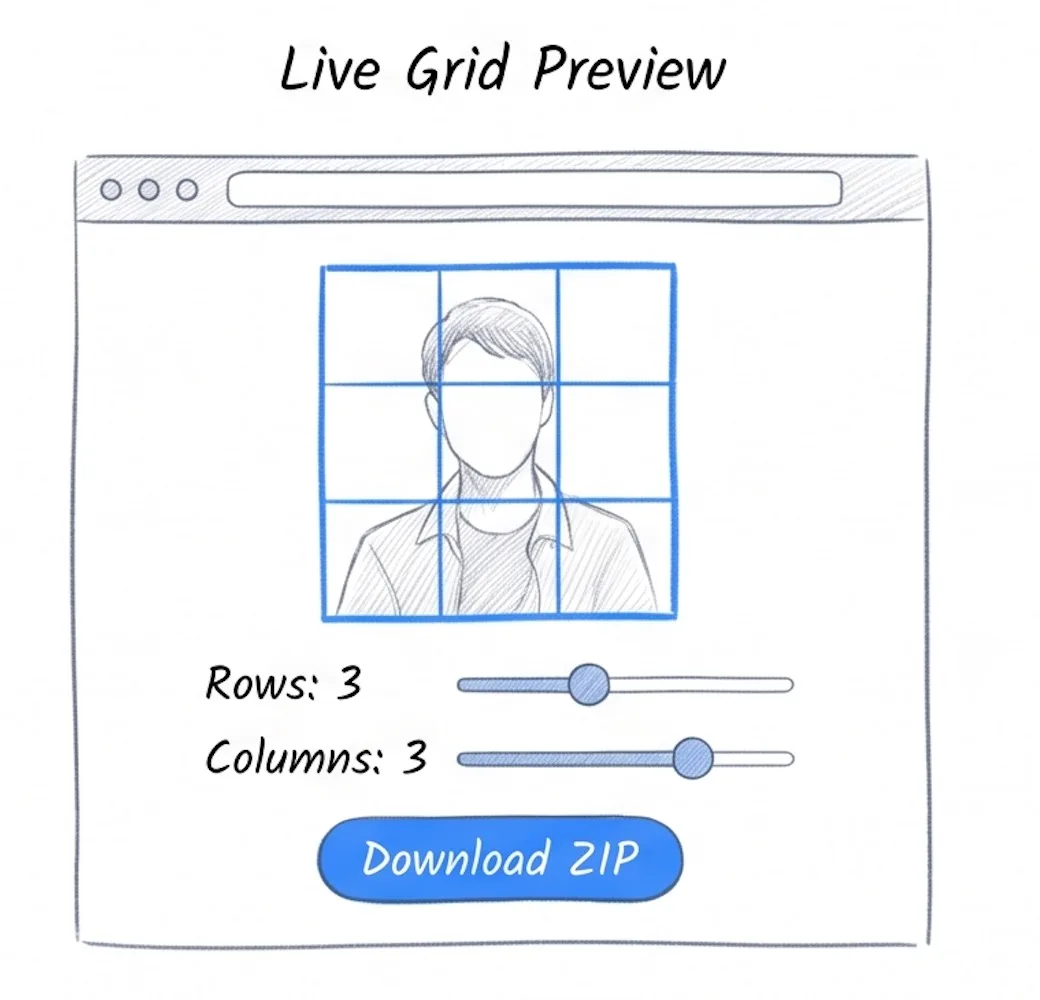
The live grid preview shows exactly where each tile will be cut before you download anything
Common Questions About Instagram Grid Splits
Do I have to crop the photo before splitting for a carousel?
No — carousels (the 1×3 panorama format) accept wide source material directly, because the three slides live inside a single post and Instagram does not crop them to square. The 1:1 crop rule applies to the 3×3 mosaic, not to carousels.
Can I split a video the same way for a 3×3 grid?
Not with an image splitter. Videos go through Instagram as Reels or carousels and follow different rules — there is no equivalent of a static 3×3 mosaic for video on the feed. If you want a video's opening frame to anchor a grid, export a still and treat it as a regular photo split.
How long does Instagram take to render the full grid?
The grid appears as soon as the ninth tile finishes uploading. Individual posts are visible immediately as you upload each one, but the assembled mosaic is only complete after the last tile. Some viewers may see a partially-built grid in the moments between uploads, which is one of the reasons to post all nine back-to-back rather than spreading them out across hours.
Does the grid still work now that Instagram shows four columns on desktop?
Most viewers will see the grid on mobile, which is still three-column. The four-column desktop view changes how the same nine posts line up — the mosaic stops working at that wider layout because the rows shift. If your audience is heavily desktop-based, factor this in; if mobile dominates (which is the case for the vast majority of Instagram traffic), a 3×3 grid still reads correctly to nearly everyone.
Recap: One Photo Into a Working Instagram Grid
- Crop the source to 1:1 using the crop tool so every tile survives Instagram's upload crop.
- Split with the 3×3 preset in the image splitter and download the ZIP.
- Post in reverse: bottom-right tile first (
tile_r3_c3), top-left tile last (tile_r1_c1).
That is the whole workflow. The aspect ratio prep saves you from Instagram's upload crop. The live grid preview saves you from cutting faces at boundaries. The reverse posting order saves the mosaic from coming out scrambled. With all three in place, a 3×3 grid takes about ten minutes from photo to completed feed.
Ready to try it? Open the free image splitter and prep your grid. If your source photo needs to be cropped first, the crop tool gets you to a clean 1:1 in a few clicks — and from there the split takes under a minute.
Ready to Compress Your Images?
Try our free online image compression tool. All processing happens in your browser - fast, private, and easy to use.
Related Articles
How to Make a Circular Profile Picture for Any Social Platform
Make a circular profile picture for Instagram, Discord, TikTok, YouTube, and more. Crop safely and download a transparent PNG for free.
How to Reduce Image Quality Online in 3 Steps (No Software, No Upload)
Reduce image quality in 3 steps with a free online tool that runs in your browser. No software, no upload, no watermark. Works for JPG, PNG, and WebP.
How to Remove Image Background Without Uploading to a Server
Remove image background for free — your photo stays on your own device, nothing gets uploaded. No signup, no watermark, unlimited.